Sheesh, I didn't update about this guy a lot did I? Well, most of the work since my last update went into doing corrections and hcanges to proportions and topology so there wasn't really much to say. Most of the detailing was done this last week! For a long time I really regretted going for an original concept instead of doing a realistic bust as the teacher recommended because he knows a ton about realistic human modeling so that would have made better use of his resources, and also because I feel I'm not experienced enough with sculpting to be able to convincingly sculpt something imaginary. But in the end I'm pretty pleased with the results. I learned a lot from both my mistakes and from trying to jump into something new and different.
Wednesday, December 15, 2010
Monday, November 29, 2010
Realistic head assignment.
This week in my Organic Modeling 2 class we got an assignment to render a realistic head using a SubSurface Scattering material in mental ray. The head model and texture is a free 3D scan from Infinite3D, but we had to take care of baking the normal map, creating other maps like spec and SSS depth, adjusting the SSS shader, and finally lighting and rendering the model ourselves.


I'm pretty impressed with the results myself, but I still see room for improvement. At least a lot of the mystery surrounding the mental ray SSS shader has been lifted. :D
All the images are rendered in Mental Ray using Maya. In all the setups I use a single light with an HDRI probe to provide additional ambient light through Final Gather.


Monday, October 25, 2010
The Rook - Model
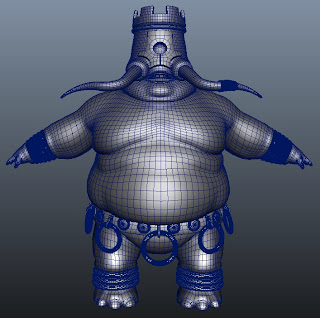
Remember this guy? I'm done with the basemesh and ready to send it over to zBrush for sculpting. I still have to UV him, but that's not a very exciting step to blog about...
The model is much denser than I would usually make it, but our teacher insisted that we put most of the detail in the basemesh to avoid having to retopologize the model after sculpting. I also felt that I had more control over the shape despite there being more manual work. I want to try a different workflow some other time where I instead start from a really rough basemesh, do all the detailing in zBrush and then retopologize the model when I'm done. I think this could be a lot faster and looser, but it kinda depends on me finding a good retopo workflow which I've heard zBrush lacks.
Enough about that though. Here is my guy:


Sunday, October 24, 2010
Colour and Design - Midterm Portrait
Time for something non-3D. In addition to Organic Modeling I'm also taking a color theory class names Colour and Design. Because Everybody at my school always complains over how hard it is and the work load, and while it's true that it's a lot of work I'm having a lot of fun with it and I feel like I learn something new every class. I haven't worked a lot with colour outside of some 3D texturing so this is a much needed subject for me
So far we haven't done a lot of work outside of theoretical stuff like value chats and colour wheels, but for our midterm we had to pick a photo and make a posterized image of it that we then were to colour with a complimentary colour scheme. I chose a red-red-orange to blue-blue-green scheme, but because of the way that colours become desaturated when mixed with whites, blacks and complimentaries the final result is rather subtle. The image I chose was from the french movie The City of Lost Children. It's a beautiful movie where pretty much every frame can be framed and put on the wall. The man is a part of a cult of blind people that serve a mad scientist in exchange for bionic eyes that allow them to see again.


All in all I'm very pleased with it, especailly considering I had to work on this while I was sick and was a nyQuil fueled zombie most of the time. I need to darken one of the midtone steps because it jumps too much when it goes from the gray to brown, and there are a few tiny spots I forgot to paint. But once I have made those corrections I plan on submitting it to the school's Spring Show.
So far we haven't done a lot of work outside of theoretical stuff like value chats and colour wheels, but for our midterm we had to pick a photo and make a posterized image of it that we then were to colour with a complimentary colour scheme. I chose a red-red-orange to blue-blue-green scheme, but because of the way that colours become desaturated when mixed with whites, blacks and complimentaries the final result is rather subtle. The image I chose was from the french movie The City of Lost Children. It's a beautiful movie where pretty much every frame can be framed and put on the wall. The man is a part of a cult of blind people that serve a mad scientist in exchange for bionic eyes that allow them to see again.

The picture is a bit grainy and the colors are a bit off because the board and the mount of the picture is so large I had to take the picture using my camera. I did my best to clean it up in photoshop but it still leaves some to be desired. It also looks much better from a distance, like this:

All in all I'm very pleased with it, especailly considering I had to work on this while I was sick and was a nyQuil fueled zombie most of the time. I need to darken one of the midtone steps because it jumps too much when it goes from the gray to brown, and there are a few tiny spots I forgot to paint. But once I have made those corrections I plan on submitting it to the school's Spring Show.
Monday, September 27, 2010
The Rook - Concept

My idea is as follows:
A small kingdom ruled over by a powerful wizard, he is known as the Wizard King. It's a peaceful kingdom, but it is surrounded by nations and countries that are always at war with each other. The kingdom has avoided conflict because they have taken a neutral stance and because the other countries fear the Wizard King's powerful magic.
However lately tensions have been rising, and the war has moved closer to the kingdom's borders. The Wizard King has slowly grown more paranoid and is spiraling into madness.
Using his powerful magic he merges men and beasts and weapons into powerful guardians. Being an avid chess player he shapes them after chess pieces. He merges his guard and their horses into agile and deadly Knights, his advisors are joined with predatory birds for fast flying Bishops, elephants seized from a traveling circus got spliced with his strongest masons and stoneworkers into the monstrous Rooks. Even his beloved wife was sacrificed in his madness and transformed into the tormented yet lethal Queen piece.
Here is my color concept that will also serve as my modeling orhtos. The plan is to make a basemesh in Maya and then take him into zBrush for heavy detailing.

Sunday, March 28, 2010
zBrush hey hey hey!
Apparently the most common blog post is the author apologizing over the lack of updates, so I'm not going there.


Instead I will post some stuff that I have been doing in Organic Modeling 1 where we just started fooling around with zBrush! I've played around with that application once or twice before but I've never really done any serious work in it, so if you don't count the spinning head in my showreel (which was just a detail pass on a model in maya) these are pretty much my first digital sculpts. They're still pretty rough but I'd say it's a good start.
By the way, these are all sculped out of a basic sphere, except for the last one which was a plane as you might see. I made no basemesh in maya. Speaking of which, what we have been working on in this class up until now has been to make a male human basemesh in Maya. You'll probably see something of him soon.
By the way, these are all sculped out of a basic sphere, except for the last one which was a plane as you might see. I made no basemesh in maya. Speaking of which, what we have been working on in this class up until now has been to make a male human basemesh in Maya. You'll probably see something of him soon.

(click for full size)
This guy is the first one I did. I spent a lot of time on him, not only because I was learning the ropes but also because I kept refining detail and trying to tweak him towards the very specific image I started out with. In the end he ended up looking nothing like my original idea at all which was more of a fish lipped frankenstein, but that's how it always works out when you doodle.

(clicky click)
Next up is this creepy son of a bitch. This guy is an idea I've had spinning around in my head for a while, initially inspired by Hoss' horrible hallucinations at the tattoo shop in House of Leaves if I remember correctly. My last entry had a bunch of thumbnails for my creature design class. Well, the dude in the top left corner with the massive arms was originally supposed to have this face but I changed the design to make him insectoid so in that case a humanoid face like this just won't do. Speaking of the creature design monster, I will post my progress as soon as I can take some pictures. I have been putting this off because I couldn't find the charger for my camera and I've been loaded down with work lately. I promised not to make excuses so enough of that, on with the show.

(you know the drill by now)
I took a bit of a different approach to this guy. Originally I wanted to test out the subtools system by giving him a pair of big fangs and eyeballs, but aligning the objects were such a pain in the butt I decided to see go for a hard surface direction instead. This one was really fast and fun, most of my time was spent on playing around with shaders and lights. My experimentation only resulted in zBrush crashing a lot on me, and as it turned out the default metal shaders looked a lot cooler than whatever I was able to slap together.
Stay tuned for some maquettes from Creature Design!
Thursday, February 11, 2010
What I'm working on this semester.
This semester I'm taking a class called Creature Design. The jist of that class is essentially to draft a concept for a creature and refine that, when the design has been properly polished and refined then we move to the next stage which is to sculpt maquette of the little freak in clay. The maquette will serve as reference for a 3D sculpt done in zBrush which will be the final product.

Sounds like a lot of fun right? I'm stoked!
So far we've only done thumbnails, which are essentialy really quick and dirty sketches with little to no shading just to block in the proportions and silhouette of the design. Here are some of mine. They were more conceptual than purely visual so some of them might be hard to get.

Homework for next week will be to take two or three of these designs and do some additional thumbs of them and flesh out the design some more with color and line if time permits.
Subscribe to:
Posts (Atom)